
For the general mechanics of server validation (the provisional/finalization flow, server_validation_status values, and offline/validation_rule_javascript fallback behavior), see Eleos’s official guide: Server Validation.
The notes below cover what that guide doesn’t – specifically, how this works within ASR’s integration.
Before Starting
Please note that Server-Side Validation will ONLY work for Actions being performed within the Loadlist, marked as a “Workflow Action” within the Eleos Platform. Server-Side Validation will NOT work for an Action executed from anywhere else within the application such as the Dashboard, Menu, and Messaging.
Enabling Server-side Validation
Workflow Actions
To enable Server-Side Validation on workflow actions, we will need to make Drive Axle actions changes, along with SQL side changes, to add the form that you are validating to the ELEOS.usp_ValidateMessage_Custom_Template procedure. Both of the following steps will need to be completed, or the message will not be validated on the server side. You can only enable server-side validation on workflow actions sent through the Eleos platform; other types of messages cannot be validated.
Drive Axle Actions
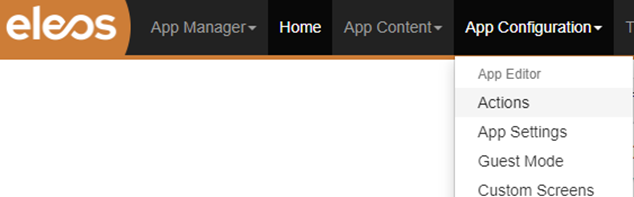
- To enable validation of workflow forms, the first thing you will need to do is log into your Drive Axle environment. After logging in, navigate to the App Manager. Inside the App Configuration dropdown, click on “Actions” as highlighted in the below screenshot.
- Find the workflow action that takes you to the form that you are wanting to validate. For example, if you wanted to add Server-Side Validation to the WORKFLOW-START form, find the action that takes you to that form. You can find the form that an action links to on the left side of the screen after clicking on an action, under the “Form” section. You can find an example of this highlighted in yellow in the following screenshot:
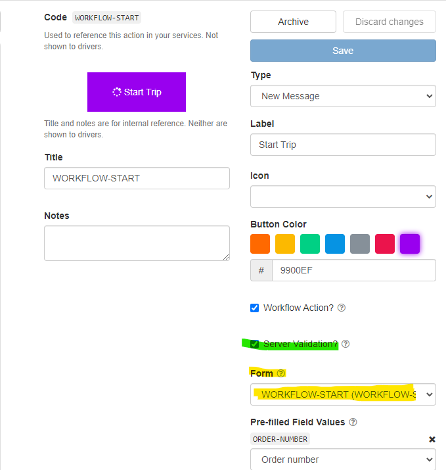
- Click on the check box next to “Server Validation?” on the action, highlighted in green in the screenshot above. This will allow Eleos to send us the “server_validation_status” and “server_validation_request” properties for this action and allow the integration to attempt to validate the form.
ELEOS.usp_ValidateMessage_Custom_Template Procedure
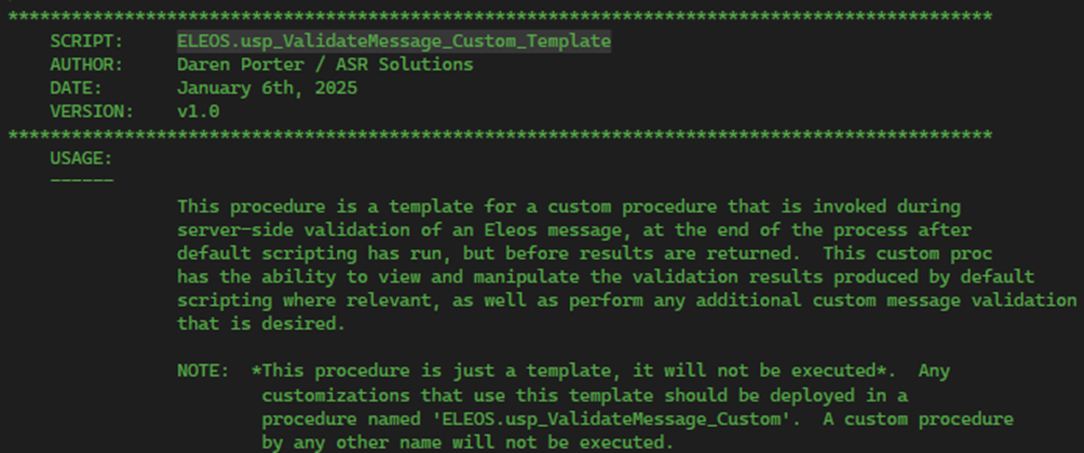
To validate fields in a specific workflow form, you will need to modify the ELEOS.usp_ValidateMessage_Custom_Template procedure inside SQL. The custom procedure has instructions on how to make modifications:
The ELEOS.usp_ValidateMessage_Custom_Template also has an example of how to read and validate a particular field on a form:
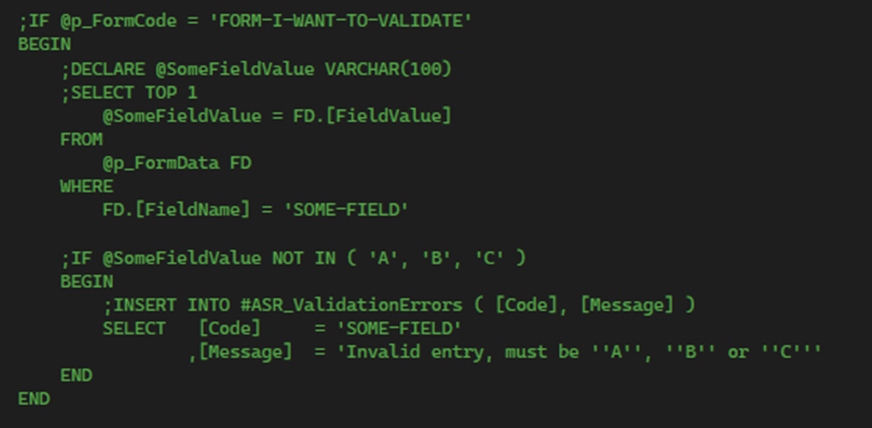
Note: If you validate a field that doesn’t exist on the form, it will prevent the driver from correcting the error and not allow workflow to continue. Please ensure that fields you are attempting to validate exist on the form.
If SQL Contracts are Not Implemented
If ELEOS.usp_ValidateMessage_Custom_Template does not exist in the database, this indicates that SQL contracts are not implemented, and instead modifications will have to be made to ELEOS.usp_ValidateMessage by following these steps:
- Connect to the SQL database. If you are attempting to make these changes inside the dev environment, connect to the dev database. If you are making these changes in a production environment, connect to the production database.
- Expand “Programmability, right click on Stored Procedures, and click “Filter”. Add a filter for the “ELEOS” schema to narrow down the stored procedures you may have deployed.
- Find the stored procedure “ELEOS.usp_ValidateMessage, right click on it, and click “Modify”.

- This will open the ELEOS.usp_ValidateMessage procedure. After it opens, scroll down to find the declaration of the @Fields table. If a field on the form you want to verify is missing from this table, make sure to add it in this declaration statement in the same way the other fields were added.
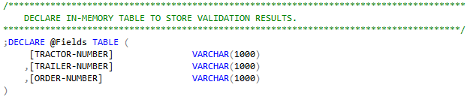
- Use the WORKFLOW-START form validation template as a reference for how to validate individual forms. You will want to add a section for if the form code passed in matches the form code you want to validate, and if it does, add logic to validate the fields of the workflow message. For example, if you want to validate that the Planned Trailer matches what the driver entered in, you will need something like what’s in the template for WORKFLOW-START.
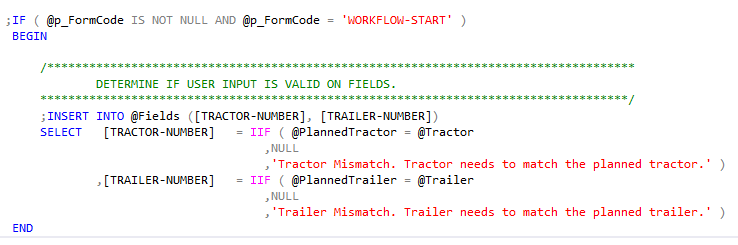
- Ensure that the field you are validating is declared inside the @Fields table, and that the error message for the field is being inserted into the correct field. For example, if you wanted an error message to occur for the field “LOAD-NUMBER”, you would declare a “LOAD-NUMBER” field into the @Fields table and insert an error message (for example, "Load number doesn’t match current load") into that field after checking against the form code.
If you follow both steps above, clicking the “Server Validation?” check box for the Drive Axle action, and then populating an error in the @Fields table for that value, it should allow you to validate fields being entered by drivers before the form is submitted.
Note: If you validate a field that doesn’t exist on the form, it will prevent the driver from correcting the error, and not allow workflow to continue. Please ensure that fields you are attempting to validate exist on the form.